Thursday, May 22, 2014
Cars Twirly Skirts
I love this Redondo skirt pattern! It comes together so nicely and the kids just love to twirl in these skirts. The pattern is from Studio Tantrum.
This time I tried something different: Five panels and five thin panels for stripes. I really like how it came out! The thin stripes broke up the busy print fabric nicely without being too bold. I will do this again, the thin stripes. It measured out to be a little more than if I had used 6 panels, not too much but still lots of twirl.
I also decided to try to invent some sort of yoga waistband. I used ribbing and some knit elastic, I'm not sure if I got the desired effect, but close enough. It's soft and can be folded over. I think I'll make the waistband longer and easier to fold over. It should be comfortable and hold tight at the same time.
I made two of these skirts. They are birthday gifts for two adorable little girls who love Lightning McQueen. I'm so glad they adore these skirts because they are sure a lot of fun to sew!
Tuesday, May 20, 2014
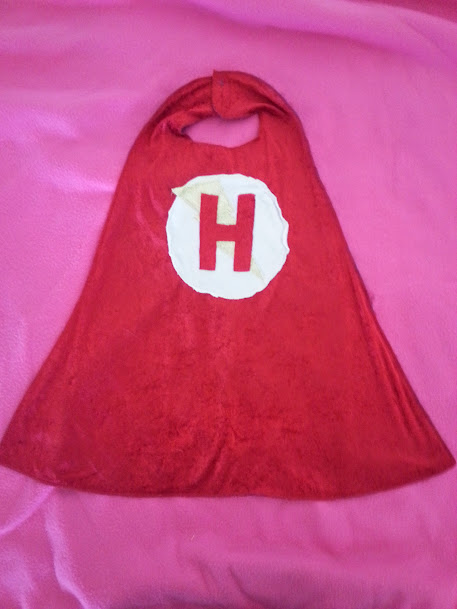
Superhero Capes
I made six superhero capes in one day! Thank you, serger!
I was only going to make one superhero cape for Henry. It would be a great 3rd birthday present! If Henry has one, Alfie will want one. Charlie should have one too. The girls will each want one. Next thing you know, I had six capes done.
I used some old royal blue polyester. This stuff was given to me and it's probably from the 70s. But it's bright and keeps it's shape, so it was just fine for a quick party cape. I used up my leftover cheap red fake velour stuff for the outer side of the capes. It's too flimsy on it's own so the two fabrics were a great pair!
I decided to applique a superhero emblem on each cape. I cut them out and ironed them on with fusable interfacing, then topstitched along the edges. This ended up being very important since every cape was a different length. Alfie had the smallest cape and Gracie had the longest. We'll need to tell them all apart!
Since I didn't have a pattern, I just freehanded the cape shape. I tried to make it shoulder width across the top and taper out to the bottom. I made the neck in backward bib fashion and used velco as the fastener. I wanted velcro so that it will pop off if the cape gets stuck at the top of the slide or something, I don't want the kids to choke!
I serged around the outside edges and have the seams on the outside. No turning! Much easier and the kids really didn't care. With the serger, I can get away with finished edges on the outside from time to time, and this is one of those times.
The birthday turned into a superhero party since every kid had a cape. They all loved the capes! It was so much fun to see them all in their capes running and "flying" around saving the world from imaginary villains.
Friday, May 9, 2014
Sandwich and Snack Bags
More Sandwich and Snack bags! I've been making a bunch of them as gifts and for my girls' lunch pails. They are just perfect for lunches and snacks on the go!
So far, the bags have been holding up really well. I handwash them sometimes and I toss them in with the laundry sometimes. Either way they come out clean and ready to reuse. No problem! I'm actually quite impressed with how well they are washing up.
Again, the nylon zippers are the best. I like using zippers rather than velcro on the bags. The nylon zippers are a lot easier to sew in and a lot easier to use. The metal zips just can't compare, but they are fine. Not that big of an issue to complain about, but I do think I've lost count of how many sewing needles I've broken while sewing in the metal zippers. Had to add the cost of a couple packs of needles to the cost of my sandwich bag supply!
Costs so far have been pretty good. I can get a lot of snack bags out of one yard of PUL fabric. I am not sure how many snack bags, but it's close to a dozen. I counted it up and promptly forgot. That's me. Ha! The zippers are a cost if I buy them; they run around $2 each. I'm almost out of my zippers in my recycled zipper stash. That was really cool having recycled zippers to use and not spend money on them, but the drawer full of zippers is now just a handful. They were mostly the metal zippers anyway.
The PUL fabric is where the money goes. It's $16.99 a yard? I think? But if you get a coupon it that brings the cost down. In any event, a dozen bags costs around $25 - $30 to make. If I bought them on etsy from someone or through retail that would cost me a whole lot more!
I also bought some food printed fabric to make lined snack bags. The PUL is plain white and then I put a quilting fabric over the outside. I think these are my favorite because of two reasons: 1. the seams are all on the inside and 2. they are just so cute!
These have been fabulous gifts. Everyone likes them a lot and I can give more than two. Here are photos of the fun snack bags that I've been making lately.
So far, the bags have been holding up really well. I handwash them sometimes and I toss them in with the laundry sometimes. Either way they come out clean and ready to reuse. No problem! I'm actually quite impressed with how well they are washing up.
Again, the nylon zippers are the best. I like using zippers rather than velcro on the bags. The nylon zippers are a lot easier to sew in and a lot easier to use. The metal zips just can't compare, but they are fine. Not that big of an issue to complain about, but I do think I've lost count of how many sewing needles I've broken while sewing in the metal zippers. Had to add the cost of a couple packs of needles to the cost of my sandwich bag supply!
Costs so far have been pretty good. I can get a lot of snack bags out of one yard of PUL fabric. I am not sure how many snack bags, but it's close to a dozen. I counted it up and promptly forgot. That's me. Ha! The zippers are a cost if I buy them; they run around $2 each. I'm almost out of my zippers in my recycled zipper stash. That was really cool having recycled zippers to use and not spend money on them, but the drawer full of zippers is now just a handful. They were mostly the metal zippers anyway.
The PUL fabric is where the money goes. It's $16.99 a yard? I think? But if you get a coupon it that brings the cost down. In any event, a dozen bags costs around $25 - $30 to make. If I bought them on etsy from someone or through retail that would cost me a whole lot more!
I also bought some food printed fabric to make lined snack bags. The PUL is plain white and then I put a quilting fabric over the outside. I think these are my favorite because of two reasons: 1. the seams are all on the inside and 2. they are just so cute!
These have been fabulous gifts. Everyone likes them a lot and I can give more than two. Here are photos of the fun snack bags that I've been making lately.
Saturday, April 19, 2014
Mulan Dress meets Dog With Scissors
We got a new puppy a few months ago, she's probably 8 or 9 months old by now. And she's very talented! Her name is Penny.
According to my five year old daughter, who is sweet as can be and always honest, Penny the puppy went into her room, used a pair of scissors and cut the sleeve of her precious Mulan dress. The dog cut and cut until the dress was destroyed! That dog didn't even ask to use the scissors!
My poor little girl was crying her eyes out over the ruined dress. It's her favorite and the dog cut it up!
Well, that puppy sure is a troublemaker. But she insisted that the dog did it. "Penny is a cutter. She likes to cut things." Hmmm.
My big eyed little girl begged me to please please please fix it. Of course, dear, Mommy can fix it.
I suppose I should have let her worry about it and face her destroyed dress for a while. Maybe I should have told her it would be very difficult to fix and I might not be able to do it. But, I think she felt bad enough and she never acts out, so I went right to work on it.
Normally, she doesn't destroy anything. She doesn't misuse scissors. And she doesn't lie. This must be a pretty bad day for her. I think she's crying for attention and so I'm going to do what only Mommy can do, and fix her dress.
The puppy was underfoot as usual, so I turned to Penny and gave her a stern lecture on the proper use of scissors and the impact of destroying special things. I scolded her firmly. Then I congratulated her on her fine motor skills, especially since she lacks thumbs. I told my daughter to get the scissors off of her dresser and put them where Penny cannot get them any more. Then I put the puppy out in the yard for her time-out (and because it was probably puppy potty time by now).
While I picked apart the shoulder seam to remove the slashed sleeve, I had my daughter sit next to me and draw pictures of hearts for me. She drew and drew. I wondered if that would bring out the truth, but she was sticking to her story. The dog did it.
Once the sleeve was removed, I used it as a pattern piece to cut out a new sleeve. One nice thing about always buying a bit too much fabric for every project, is that I have an awesome supply of scraps, and I lucked out and had plenty of the same fabric for a new sleeve. Score!
I cut out a new sleeve, making sure to allow for a seam allowance on the edges. When I removed the old sleeve, I cut off the seam that went from wrist to armpit to flatten it out to use as a pattern. Rather than use the seam ripper on that line, I just trimmed it off with the scissors and remembered to give it a seam allowance when I cut the new one.
I serged around the shoulder seam and around the hem before serging down the inside seam of the sleeve. And then I straight stitched the top of the sleeve to the armhole of the dress. And there we have it: Perfectly repaired Mulan dress!
My little daughter is so happy to have her favorite princess costume in perfect condition again! I told her that I can only fix it once. There will be no next time. If the dog cuts her dress again, or anything else, then we'll have to throw it away. The dog gets no second chances. She nodded and said she understood. So I had her go show Penny that it was all fixed so the poor puppy could get over her guilt.
The repair really didn't take long. The most difficult part of it was keeping a straight face when my daughter was telling me how the dog used scissors and cut with them. She is totally sticking to her story. When Daddy came home, she repeated it for him and then proudly showed off her new sleeve.
According to my five year old daughter, who is sweet as can be and always honest, Penny the puppy went into her room, used a pair of scissors and cut the sleeve of her precious Mulan dress. The dog cut and cut until the dress was destroyed! That dog didn't even ask to use the scissors!
My poor little girl was crying her eyes out over the ruined dress. It's her favorite and the dog cut it up!
Well, that puppy sure is a troublemaker. But she insisted that the dog did it. "Penny is a cutter. She likes to cut things." Hmmm.
My big eyed little girl begged me to please please please fix it. Of course, dear, Mommy can fix it.
I suppose I should have let her worry about it and face her destroyed dress for a while. Maybe I should have told her it would be very difficult to fix and I might not be able to do it. But, I think she felt bad enough and she never acts out, so I went right to work on it.
Normally, she doesn't destroy anything. She doesn't misuse scissors. And she doesn't lie. This must be a pretty bad day for her. I think she's crying for attention and so I'm going to do what only Mommy can do, and fix her dress.
The puppy was underfoot as usual, so I turned to Penny and gave her a stern lecture on the proper use of scissors and the impact of destroying special things. I scolded her firmly. Then I congratulated her on her fine motor skills, especially since she lacks thumbs. I told my daughter to get the scissors off of her dresser and put them where Penny cannot get them any more. Then I put the puppy out in the yard for her time-out (and because it was probably puppy potty time by now).
While I picked apart the shoulder seam to remove the slashed sleeve, I had my daughter sit next to me and draw pictures of hearts for me. She drew and drew. I wondered if that would bring out the truth, but she was sticking to her story. The dog did it.
Once the sleeve was removed, I used it as a pattern piece to cut out a new sleeve. One nice thing about always buying a bit too much fabric for every project, is that I have an awesome supply of scraps, and I lucked out and had plenty of the same fabric for a new sleeve. Score!
I cut out a new sleeve, making sure to allow for a seam allowance on the edges. When I removed the old sleeve, I cut off the seam that went from wrist to armpit to flatten it out to use as a pattern. Rather than use the seam ripper on that line, I just trimmed it off with the scissors and remembered to give it a seam allowance when I cut the new one.
I serged around the shoulder seam and around the hem before serging down the inside seam of the sleeve. And then I straight stitched the top of the sleeve to the armhole of the dress. And there we have it: Perfectly repaired Mulan dress!
My little daughter is so happy to have her favorite princess costume in perfect condition again! I told her that I can only fix it once. There will be no next time. If the dog cuts her dress again, or anything else, then we'll have to throw it away. The dog gets no second chances. She nodded and said she understood. So I had her go show Penny that it was all fixed so the poor puppy could get over her guilt.
The repair really didn't take long. The most difficult part of it was keeping a straight face when my daughter was telling me how the dog used scissors and cut with them. She is totally sticking to her story. When Daddy came home, she repeated it for him and then proudly showed off her new sleeve.
Thursday, February 20, 2014
Grandpa's Quilt
After my grandpa passed away, my grandma gave me a big box of his shirts and pajamas and things he wore daily that would not be suitable to pass on to anyone else. These were shirts that he wore day after day, year after year, while working on his ranch or relaxing at home. She told me to do whatever I wanted with them. I assume she meant to sew them into whatever I want.
After lots of thinking and searching for a quilt top pattern, I made this pattern up myself. I wanted to showcase the shirts and not lose sight of the fact that they were Grandpa's shirts. If I cut them into pieces too small, they might look like worn fabric, but not necessarily look like his shirts. I wanted to keep the pockets and yokes in tact. I ended up making rectangles with small squares in the center for the blocks.
I tried to lay the blocks next to each other, but then decided I liked a border between each block to frame them all. First, I used a striped pajama pant as the framework between the blocks. It didn't look right when I backed up and saw it from a distance. I ended up using this dark blue, which wasn't part of his box of clothing items, but it framed it in so nicely and it was a nice strong bold color. I like the strength of it as it reminded me of my Grandpa's personality.
Honestly, I don't remember what the back is. It is probably the same blue as the borders on the front. I think I bought a set of sheets to use as the back and borders, but I can't recall. I made this quilt 15 years ago and my focus was the shirts on the front, not the insignificance of the back. Nobody sees that part anyway.
I know I put two layers of poly-fill in it though. I like my quilts to be fluffy and heavy. If anyone is ever going to sleep under this quilt, it will be warm and snugly!
After a year of sewing (and sometimes just gazing or feeling it or thinking about it) I gave this quilt to my grandma. She enjoys it very much! It lays on her bed. I am more proud of this quilt than any other sewing project that I've ever made. I miss my grandpa a lot, but I feel so good having made this tribute to him and sharing it with my family. This quilt warms my heart!
Friday, January 31, 2014
Fantastic Mr. Fox Scarf
I found this awesome fox scarf online when I was browsing around for quick and easy projects. I've been enjoying simple sewing projects and I immediately fell in love with this fox scarf! And the blogger who made it offered up a free pattern too. Awesome! I found it at Prudent Baby.
I especially love the orange plaid flannel or wool or whatever she made her scarf with. It looks adorably foxy and warm. I looked and looked for some orange plaid warm fabric that wasn't fleece. Fleece is super popular, and yet, I just don't like it. Finally found some fall clearance broadcloth at Joann Fabrics and decided that even though it isn't cuddly, it would do just fine. I picked up some white shaggy minky at Hobby Lobby. I think that's really all I need, aside from some black trim and embroidery thread for the snout. I'm sure I'll find something in my stash to accommodate the facial features.
When I think of this fox scarf, I hear George Clooney's voice. Thusly, I have named this scarf "Fantastic Mr. Fox Scarf". There ya go, George.
Cutting minky is best done outdoors! In mid-January we have sunshine and temps in the 70s and 80s. Perfect weather for cutting fabric out on the back deck. When I cut the minky, the edges of the fuzz fall off and float around. If you dare to cut this stuff, do not touch your nose or breath in too deeply!
I cut enough pieces to make four fox scarves. I think it will be so darn cute that I'll wish I had made more, so I'm just going to make more right off the bat. One yard of each the orange and the white minky will yield four 36" fox scarves. A little extra will help with getting all of the legs and ears cut out though. Squeezing those pieces into the layout was tricky.
After I cut each piece, I shake it to shake off the loose fuzzies before bringing it in and running it through my sewing machine. I made it snow!
Putting together the legs and ears was fun. The small pieces are adorable. . Once I had them sewn together, I flipped them around and stuffed them with polyfill. I didn't stuff the ears much, just enough to give them a bit of poof. The legs are stuffed nice and plump. I then folded the edges in just a tad and topstitched the openings before I zig-zagged it to the scarf. I enjoyed having a bin full of legs and ears. Fox parts!
Sewing the legs onto the minky fox tummy was a challenge. My presser foot was continuously becoming tangled. I used a pair of tweezers to pull the loops off of the presser foot when they looped on, and I learned this by using my fingers and stabbing myself with the needle that is right there. Whoops. Jab yourself and you learn pretty fast the value of a nice pair of tweezers! The minky is fabulously soft and fuzzy! Cannot wait to wrap a fantastic fox hide around my neck! Won't leave it on long in this summer weather though.
I didn't have much in the way of buttons, but I found a matching set of brown buttons. I also had a brown piece of fleece that I used for the nose. Very cute. Black is a better contrast, but the brown looks great too. I prefer the soft fuzzy nose to the embroidered nose anyway. The whiskers are just a couple of strands of embroidery floss.
Once I had all of the noses, eyes, whiskers, ears and legs attached, I sewed the fox tops to the fox tummies. Putting the right sides together, I sewed around the edges making sure not to sew the legs and whiskers into the seams. I left a hole in the side of the "hide" to flip it around. Then topstitched the opening closed.
I believe that if I had used a heavier fabric for the fox top, the scarf would lay better. It doesn't have that thick and wooly feeling that really keeps a neck warm in the winter. The minky is very soft and fuzzy, it feels wonderful. It is more of a whimsical feeling scarf, which is also great!
I tried the scarf on and immediately wished it was longer. Finished length is 35". My 5 year old thought it was great, and I like the length on her as well. Next set of fox hide scarves will be longer. We both enjoyed wearing a Fantastic Mr. Fox Scarf!
And I just have to laugh at my "selfie" picture in the bathroom mirror! Notice the bandaid on my finger? That was my sewing lesson of the day: Tweezers are a great tool!
I especially love the orange plaid flannel or wool or whatever she made her scarf with. It looks adorably foxy and warm. I looked and looked for some orange plaid warm fabric that wasn't fleece. Fleece is super popular, and yet, I just don't like it. Finally found some fall clearance broadcloth at Joann Fabrics and decided that even though it isn't cuddly, it would do just fine. I picked up some white shaggy minky at Hobby Lobby. I think that's really all I need, aside from some black trim and embroidery thread for the snout. I'm sure I'll find something in my stash to accommodate the facial features.
When I think of this fox scarf, I hear George Clooney's voice. Thusly, I have named this scarf "Fantastic Mr. Fox Scarf". There ya go, George.
Cutting minky is best done outdoors! In mid-January we have sunshine and temps in the 70s and 80s. Perfect weather for cutting fabric out on the back deck. When I cut the minky, the edges of the fuzz fall off and float around. If you dare to cut this stuff, do not touch your nose or breath in too deeply!
I cut enough pieces to make four fox scarves. I think it will be so darn cute that I'll wish I had made more, so I'm just going to make more right off the bat. One yard of each the orange and the white minky will yield four 36" fox scarves. A little extra will help with getting all of the legs and ears cut out though. Squeezing those pieces into the layout was tricky.
After I cut each piece, I shake it to shake off the loose fuzzies before bringing it in and running it through my sewing machine. I made it snow!
Putting together the legs and ears was fun. The small pieces are adorable. . Once I had them sewn together, I flipped them around and stuffed them with polyfill. I didn't stuff the ears much, just enough to give them a bit of poof. The legs are stuffed nice and plump. I then folded the edges in just a tad and topstitched the openings before I zig-zagged it to the scarf. I enjoyed having a bin full of legs and ears. Fox parts!
Sewing the legs onto the minky fox tummy was a challenge. My presser foot was continuously becoming tangled. I used a pair of tweezers to pull the loops off of the presser foot when they looped on, and I learned this by using my fingers and stabbing myself with the needle that is right there. Whoops. Jab yourself and you learn pretty fast the value of a nice pair of tweezers! The minky is fabulously soft and fuzzy! Cannot wait to wrap a fantastic fox hide around my neck! Won't leave it on long in this summer weather though.
I didn't have much in the way of buttons, but I found a matching set of brown buttons. I also had a brown piece of fleece that I used for the nose. Very cute. Black is a better contrast, but the brown looks great too. I prefer the soft fuzzy nose to the embroidered nose anyway. The whiskers are just a couple of strands of embroidery floss.
Once I had all of the noses, eyes, whiskers, ears and legs attached, I sewed the fox tops to the fox tummies. Putting the right sides together, I sewed around the edges making sure not to sew the legs and whiskers into the seams. I left a hole in the side of the "hide" to flip it around. Then topstitched the opening closed.
I believe that if I had used a heavier fabric for the fox top, the scarf would lay better. It doesn't have that thick and wooly feeling that really keeps a neck warm in the winter. The minky is very soft and fuzzy, it feels wonderful. It is more of a whimsical feeling scarf, which is also great!
I tried the scarf on and immediately wished it was longer. Finished length is 35". My 5 year old thought it was great, and I like the length on her as well. Next set of fox hide scarves will be longer. We both enjoyed wearing a Fantastic Mr. Fox Scarf!
And I just have to laugh at my "selfie" picture in the bathroom mirror! Notice the bandaid on my finger? That was my sewing lesson of the day: Tweezers are a great tool!
Saturday, January 25, 2014
Horse Race Track Game
Last night we went to a party and the hosts had a game that they made, it was tons of fun! They had a "race track" that was sewn on a large piece of green felt. And they had six toy horses and a pair of dice. Since we were at a party for adults, we played horse races by betting on the horses. Me, I was checking out the sewing on the felt and thinking how I could reproduce it. My husband was thinking the same thing, he mentioned to me to take notice of the racetrack so I could sew one. Great minds think alike!
It was done on one piece of green felt. The stitching was in a contrast white. I asked the guy who owned the game about it and he said his step mom made it. It was serged around the edges and straight stitched with double lines for the lanes and single lines for the spaces. I could do that.
Today, I looked through my fabric and what did I find? A large piece of dark green polyester! It was polyester, but it was the perfect size and color. It would be great for a practice piece if anything. I had a feeling sewing long straight lines might be a challenge.
My green piece of fabric is 40" x 56". I made six "lanes" that are 6.25" wide and I made spaces that are 7" long. Like the felt at the party, I serged the edges and straight stitched the lanes with double lines and the spaces with a single line.
I discovered that sewing straight lines is actually harder than it sounds!
I googled and looked for some tips online, but all that I found were methods of sewing straight lines by using the guides on the machine. That does work well, but only if you're sewing near the edge of the fabric. In this case, the guide marks will not be of much use.
That's ok. I'm resourceful! I measured and pinned to mark the lines. Then I took my cloth to the ironing board and ironed a crease where my stitching would go. Measured again to make sure I had 6.25" all the way down the row and was keeping my line straight.
Then I moved the fabric to the machine and sewed along the crease. When I was done, I ironed the stitching and flattened out the crease. Ta-Da!!! Worked like a charm! My stitches are (mostly) straight.
I repeated the same process with the spaces. I made it six lanes across and 8 spaces long. I think my lanes are wider than the game board we played on last night, but that's ok. I think this is a flexible project. As long as the spaces are big enough for a toy horse, they're just fine. I'm sure that four lanes or eight lanes would be fine too, you could make this race track any size you think would be best for you.
Once I had all of the stitching done, I began to applique the lane numbers. The lanes or the toys need to be numbered. I printed numbers on Word, flipped them backward and cut them out of some bright red scrap fabric that was in my scrap basket.
Using Heat n Bond, I ironed the numbers on to the fabric in the first row (which is when I flop them over right side up again). I top-stitched the numbers and the race track was ready for action!
Since we didn't have six toy horses, we improvised and gathered up some toys that looked like they wanted to race. The kids were all skeptical since Mom and Dad usually have really lame ideas, but they soon were laughing and cheering for their favorite toy to win.
The game is played by rolling two dice. Each die moves a player one space. For example, if a roll of the dice results in a 3 and a 5, the toy in lane 3 moves one space and the toy in lane 5 moves one space. If a roll results in snake eyes, the toy in lane one moves two spaces because it moves one space for each time the number one comes up.
When we played as a family, each person chose a toy to cheer for. We took turns rolling the dice. We showed the kids that it doesn't matter who is older, wiser, stronger, or faster. Everyone has the same chance of winning. It's a game of chance and random results. The winner can be anyone! Only the dice know.
It was done on one piece of green felt. The stitching was in a contrast white. I asked the guy who owned the game about it and he said his step mom made it. It was serged around the edges and straight stitched with double lines for the lanes and single lines for the spaces. I could do that.
Today, I looked through my fabric and what did I find? A large piece of dark green polyester! It was polyester, but it was the perfect size and color. It would be great for a practice piece if anything. I had a feeling sewing long straight lines might be a challenge.
My green piece of fabric is 40" x 56". I made six "lanes" that are 6.25" wide and I made spaces that are 7" long. Like the felt at the party, I serged the edges and straight stitched the lanes with double lines and the spaces with a single line.
I discovered that sewing straight lines is actually harder than it sounds!
I googled and looked for some tips online, but all that I found were methods of sewing straight lines by using the guides on the machine. That does work well, but only if you're sewing near the edge of the fabric. In this case, the guide marks will not be of much use.
That's ok. I'm resourceful! I measured and pinned to mark the lines. Then I took my cloth to the ironing board and ironed a crease where my stitching would go. Measured again to make sure I had 6.25" all the way down the row and was keeping my line straight.
Then I moved the fabric to the machine and sewed along the crease. When I was done, I ironed the stitching and flattened out the crease. Ta-Da!!! Worked like a charm! My stitches are (mostly) straight.
I repeated the same process with the spaces. I made it six lanes across and 8 spaces long. I think my lanes are wider than the game board we played on last night, but that's ok. I think this is a flexible project. As long as the spaces are big enough for a toy horse, they're just fine. I'm sure that four lanes or eight lanes would be fine too, you could make this race track any size you think would be best for you.
Once I had all of the stitching done, I began to applique the lane numbers. The lanes or the toys need to be numbered. I printed numbers on Word, flipped them backward and cut them out of some bright red scrap fabric that was in my scrap basket.
Using Heat n Bond, I ironed the numbers on to the fabric in the first row (which is when I flop them over right side up again). I top-stitched the numbers and the race track was ready for action!
Since we didn't have six toy horses, we improvised and gathered up some toys that looked like they wanted to race. The kids were all skeptical since Mom and Dad usually have really lame ideas, but they soon were laughing and cheering for their favorite toy to win.
The game is played by rolling two dice. Each die moves a player one space. For example, if a roll of the dice results in a 3 and a 5, the toy in lane 3 moves one space and the toy in lane 5 moves one space. If a roll results in snake eyes, the toy in lane one moves two spaces because it moves one space for each time the number one comes up.
When we played as a family, each person chose a toy to cheer for. We took turns rolling the dice. We showed the kids that it doesn't matter who is older, wiser, stronger, or faster. Everyone has the same chance of winning. It's a game of chance and random results. The winner can be anyone! Only the dice know.
Subscribe to:
Posts (Atom)