I decided to make dog coats. I'm not sure why exactly, just because I suppose.
I've had this pattern for a while now, it's been sitting idle for a couple of years in my pattern collection. I haven't even tried it yet! Today seemed like a good time to try it out, so I did.
Now that I have my Etsy shop, I have a good excuse to make multiple items. I chose some fabrics and started cutting. It's nice to be able to use up my smaller pieces of minky fabric. That will make a nice warm dog coat.
The coat looks more like a small horse blanket. Maybe I should make one for Libby's Barbie doll horse. She might like that.
I chose several combos and started putting them together. The pattern calls for two thin straps to go under the belly of the dog, but I think one wide strap would work better.
I finished them off with velcro and then I was ready to dress my dog! Penny wasn't such a willing participant in my quest to make her adorable. Apparently, she thinks she's cute enough without a coat. Ha!
Monday, January 19, 2015
Sunday, December 21, 2014
New Family Christmas Stockings
I'm making stockings like mad. They are fun and easy, so why not!
We are having a low-key easy Christmas this year, and that includes decorating. I decided not to get the tote boxes out of the garage and unpack, decorate, undecorate, and repack. The boxes are staying put. But, that's where our nice matching stockings are stored.
So.....
I made new stockings!
All different! The kids love them! Let's hope Santa fills them up to the top!
We are having a low-key easy Christmas this year, and that includes decorating. I decided not to get the tote boxes out of the garage and unpack, decorate, undecorate, and repack. The boxes are staying put. But, that's where our nice matching stockings are stored.
So.....
I made new stockings!
All different! The kids love them! Let's hope Santa fills them up to the top!
Monday, December 8, 2014
Christmas Twirly Skirt
Guess what? It's Christmas season and my kids have nothing festive to wear. And, I did the silliest thing ever: I misplaced my Redondo skirt pattern! I've been searching for it for over a month now and still cannot find it!
Out of desperation, I took one of Libby's skirts from her drawer and used it to trace out a new pattern. At least now I have the size 6 version of the pattern. I would freehand it, but it's hard to get the sizing and the swirls just right.
I scored some funky green and red chevron printed fabric and I paired it with some green and red polka dot. It's going to be so colorful and fun! It will also double up as a Dr. Seuss skirt in March for his birthday celebration at school. Awesome! Love it when I can get two occasions out of an outfit.
I made one Redondo skirt for my daughter, and one for my Etsy shop. I wish I hadn't run out of the chevron print, but I got the end of the bolt so I know that's all there is to that. I only have half a yard left and that's not enough for another twirly skirt.
Merry Christmas and Happy Twirling!
Out of desperation, I took one of Libby's skirts from her drawer and used it to trace out a new pattern. At least now I have the size 6 version of the pattern. I would freehand it, but it's hard to get the sizing and the swirls just right.
I scored some funky green and red chevron printed fabric and I paired it with some green and red polka dot. It's going to be so colorful and fun! It will also double up as a Dr. Seuss skirt in March for his birthday celebration at school. Awesome! Love it when I can get two occasions out of an outfit.
I made one Redondo skirt for my daughter, and one for my Etsy shop. I wish I hadn't run out of the chevron print, but I got the end of the bolt so I know that's all there is to that. I only have half a yard left and that's not enough for another twirly skirt.
Merry Christmas and Happy Twirling!
Friday, December 5, 2014
Pink Christmas Stockings
I made a bundle of little Christmas stockings out of fabric printed with breast cancer pink ribbons and sayings. I also used some other pink prints to make enough stockings. I am making these for my new "cancer club" friends. The ladies in my breast cancer support group have been really great and we are having a group meeting in mid-December; these will be fun to bring along and show my gratitude to them for becoming such a source of information, strength and friendship to me.
I made the stockings by freehand drawing a stocking shape and cutting out several. No big deal there, pretty simple. I tried to keep it small, yet big enough. They aren't too large.
Then I added a cuff made of a small pink gingham print. It's cute. I embroidered names on the cuffs before I cut them and added them to the stockings. They aren't perfect, but they are good enough. I then folded the cuffs over and attached them to the tops of the stockings.
I see that I have stockings going in each direction. Whoops. Oh well. Since they won't be hung together (each lady will take one home with her) it shouldn't matter.
I made them completely on the serger. This was a good project if you want to practice serging curves because the stocking has the heel, toe, and ankle curves.
When you get to this point in the stocking:
You need to curve around the ankle but you can't because the knife will cut the fabric. This is how I do it and I get a great seam every time!
I pull the fabric so that it is straight. It will come out just fine when you lay it flat again.
When I go around the toe and heel, the curve is the opposite way, so I just serge slowly and lift the presser foot to adjust if needed. Those are easier.
I showed the top picture to a breast cancer support group on facebook and the ladies there went crazy for it! There were at least 50 requests for me to make them and sell or give them to the ladies on that forum. Amazing response! Because of the positive response, I went out to search for more pink ribbon fabric. I purchased this fabric at a quilting shop that went out of business last summer. I checked every store that sells fabric, and couldn't find any. I did find some online, but by the time I order fabric online, get the stockings made and shipped out to buyers, it would be after Christmas already. So, I will keep this project in mind for next Christmas and get ready earlier!
In the meantime, the ladies in my breast cancer support group are going to get these cute little stockings. They are quick and easy to make and come from the heart. I'm sure they will really like them! (hoping anyway!)
Little Makeup Bag
My husband invited me to tag along to an overnight conference. I could hang out in the hotel and just relax while he and his cohorts went to meetings. I thought that was a grand idea! I quickly threw together an overnight bag, but I didn't have a makeup bag that I wanted to take. I had one that was too big, another that was too big, and another that is too dark inside and I can never find anything in it. Hmmm.
What else would I do in a situation like this? I made one!
First thing I did was look through my zipper stash and I found a 7" plastic pink zipper. Great! Then I looked through my PUL fabrics and found something that matched up. I cut two rectangles of the PUL so that the zipper edge was 8" giving me plenty of room to secure the zipper on the corners.
I sewed the zipper on each piece, one on each side, and then I sewed up the sides and bottom of the bag. When I finished, I boxed the corners on the bottom edge to give it a little volume and a base to stand on. Worked great!
My little makeup bag was cut and sewn in about 20 minutes. It was the perfect size, not too heavy and a nice bright color. Love it!
What else would I do in a situation like this? I made one!
First thing I did was look through my zipper stash and I found a 7" plastic pink zipper. Great! Then I looked through my PUL fabrics and found something that matched up. I cut two rectangles of the PUL so that the zipper edge was 8" giving me plenty of room to secure the zipper on the corners.
I sewed the zipper on each piece, one on each side, and then I sewed up the sides and bottom of the bag. When I finished, I boxed the corners on the bottom edge to give it a little volume and a base to stand on. Worked great!
My little makeup bag was cut and sewn in about 20 minutes. It was the perfect size, not too heavy and a nice bright color. Love it!
Sunday, November 2, 2014
Opened my Etsy Shop!
I'm so excited! I've been wanting to do this for a long time, and I finally got it put together this past month. I opened an online store on Etsy!
https://www.etsy.com/shop/MaryMadeIt853?ref=hdr_shop_menu
I actually opened it a few weeks ago and so far, I've sold two hats. I'm super excited about that! I've been sewing and building up a bit of an inventory for the Etsy shop.
I'm mostly selling items that I've given as gifts and people just love them. Those are the wet bags and twirly skirts. I'm also selling the duplicate items. Sometimes, I make two or more of something and give the best one as a gift and save the others to give as gifts later. This way, if I screw up a project, I have a backup. A good example of this is the Charlie Brown dress. I was asked to make one for a little girl who loves the Peanuts gang, but the mom wanted it sleeveless and I really thought it would look better with puff sleeves. I made both and they both looked good. I made four fox scarves too. In fact, I like those so much that I'm going to make more!
My daughters are outgrowing their deep desire for princess dresses. They used to beg for every dress from every movie and now they just don't want to play dress-up like they used to. I haven't outgrown it though! I still love to sew princess dresses and costumes, and so I will! Someone out there will enjoy them if my girls won't. I'm also going to sew more for boys.
Anyway, I'm happy to have my little shop open. My serger needs to go in for its annual servicing soon and I need more thread and supplies, so I'm hoping my sales will help support my hobby. I don't expect to get rich or anything, but why not make a buck?
In progress right now are child sized aprons, alligator scarves and reusable baby wipes (eww!).
I'm already looking forward to making a bunch of Christmas things. I think some stockings with names embroidered will be perfect!
Go check out my little shop and stop back periodically to see what's new. Thanks!
https://www.etsy.com/shop/MaryMadeIt853?ref=hdr_shop_menu
I actually opened it a few weeks ago and so far, I've sold two hats. I'm super excited about that! I've been sewing and building up a bit of an inventory for the Etsy shop.
I'm mostly selling items that I've given as gifts and people just love them. Those are the wet bags and twirly skirts. I'm also selling the duplicate items. Sometimes, I make two or more of something and give the best one as a gift and save the others to give as gifts later. This way, if I screw up a project, I have a backup. A good example of this is the Charlie Brown dress. I was asked to make one for a little girl who loves the Peanuts gang, but the mom wanted it sleeveless and I really thought it would look better with puff sleeves. I made both and they both looked good. I made four fox scarves too. In fact, I like those so much that I'm going to make more!
My daughters are outgrowing their deep desire for princess dresses. They used to beg for every dress from every movie and now they just don't want to play dress-up like they used to. I haven't outgrown it though! I still love to sew princess dresses and costumes, and so I will! Someone out there will enjoy them if my girls won't. I'm also going to sew more for boys.
Anyway, I'm happy to have my little shop open. My serger needs to go in for its annual servicing soon and I need more thread and supplies, so I'm hoping my sales will help support my hobby. I don't expect to get rich or anything, but why not make a buck?
In progress right now are child sized aprons, alligator scarves and reusable baby wipes (eww!).
I'm already looking forward to making a bunch of Christmas things. I think some stockings with names embroidered will be perfect!
Go check out my little shop and stop back periodically to see what's new. Thanks!
Saturday, August 23, 2014
Pirate Costume
Ahoy, Matey!
What do you do when your grandson has Pirate Day at preschool the very next morning? Well, this is what I do!
I ran to Walmart just to grab up some plain black fabric for a pair of pirate shorts, I had the skeleton fabric left over from several Halloweens ago and I didn't think of the candy stripes until I went shopping. This is my pirate fabric collection now! I picked up the skull and crossbones (with glitter), the candy stripes and the solid black at Walmart.
Walmart isn't my favorite place to buy fabric because the quality is so cheap, but this is for a 3 hour preschool day so I don't need to spend much or drive further for higher quality fabric. Walmart fabric is just fine. As you can see, I scored.
It didn't take long and I had a pair of shorts done! I used a pajama pattern to make the shorts; I just adjusted the length and made them pointy. I didn't use a pattern for the hem, winging it worked just fine. I did a small rolled hem on the bottom instead of leaving it to fray. I didn't know if leaving the bottom unhemmed would cause a problem with unraveling the fabric, so I hemmed it. Hemming a chevron is a bit of a challenge, but it can be done. The waist is a simple elastic waistband.
I also cut out a little skull and sewed it to the knee of the shorts to bring it all together. From far away it just looks like a smudge, but it's pretty cute close up.
The belt sash was easy. I just guessed on width and length and it came out just fine. I decided to make pointy tips rather than blunt ends. I'm sure pirates had some of each. The candy stripe sash really added to the fun of the costume! Glad I thought of it.
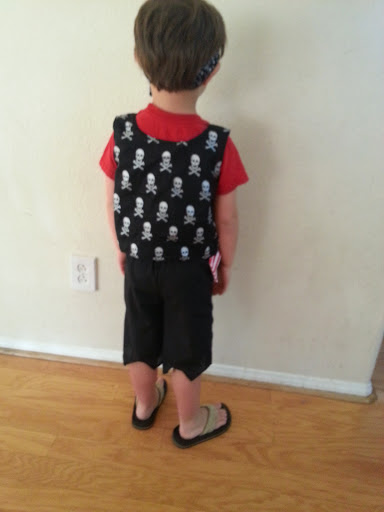
The vest is the best part of the costume if you ask me. I used a tank top pattern and just cut the front down the middle instead of cutting it along the fold of the fabric as instructed. I also tapered the neckline straight down to the middle instead of doing a scoop neck. I cut out two, one of the skull fabric and one of solid black so that the vest is lined and has a bit of a heavier vest weight to it instead of a light vest. I didn't think it would hang well if I just hemmed it up.
I topped it off with a headband made of the skeleton fabric. They're just too cute to leave out of the costume.
As you can see, he is wearing a store-bought Tshirt. I was in a time crunch and we wanted him to be comfortable, so an old Tshirt did the trick to finish off the costume. The color was just right, but white or black or stripes would have been good too.
Since this is a sewing blog, here is the obligatory back view photo of the costume: Just as cute as the front!
What do you do when your grandson has Pirate Day at preschool the very next morning? Well, this is what I do!
I ran to Walmart just to grab up some plain black fabric for a pair of pirate shorts, I had the skeleton fabric left over from several Halloweens ago and I didn't think of the candy stripes until I went shopping. This is my pirate fabric collection now! I picked up the skull and crossbones (with glitter), the candy stripes and the solid black at Walmart.
Walmart isn't my favorite place to buy fabric because the quality is so cheap, but this is for a 3 hour preschool day so I don't need to spend much or drive further for higher quality fabric. Walmart fabric is just fine. As you can see, I scored.
It didn't take long and I had a pair of shorts done! I used a pajama pattern to make the shorts; I just adjusted the length and made them pointy. I didn't use a pattern for the hem, winging it worked just fine. I did a small rolled hem on the bottom instead of leaving it to fray. I didn't know if leaving the bottom unhemmed would cause a problem with unraveling the fabric, so I hemmed it. Hemming a chevron is a bit of a challenge, but it can be done. The waist is a simple elastic waistband.
I also cut out a little skull and sewed it to the knee of the shorts to bring it all together. From far away it just looks like a smudge, but it's pretty cute close up.
The belt sash was easy. I just guessed on width and length and it came out just fine. I decided to make pointy tips rather than blunt ends. I'm sure pirates had some of each. The candy stripe sash really added to the fun of the costume! Glad I thought of it.
The vest is the best part of the costume if you ask me. I used a tank top pattern and just cut the front down the middle instead of cutting it along the fold of the fabric as instructed. I also tapered the neckline straight down to the middle instead of doing a scoop neck. I cut out two, one of the skull fabric and one of solid black so that the vest is lined and has a bit of a heavier vest weight to it instead of a light vest. I didn't think it would hang well if I just hemmed it up.
I topped it off with a headband made of the skeleton fabric. They're just too cute to leave out of the costume.
As you can see, he is wearing a store-bought Tshirt. I was in a time crunch and we wanted him to be comfortable, so an old Tshirt did the trick to finish off the costume. The color was just right, but white or black or stripes would have been good too.
Since this is a sewing blog, here is the obligatory back view photo of the costume: Just as cute as the front!
My grandson wore it all day! He didn't take it off until pajama time and guess what he wanted to wear the next morning? Yup! You guessed it! His new Pirate Costume!
Subscribe to:
Posts (Atom)