Saturday, November 30, 2013

Toy Potholders and Ovenmitts

My grandson loves to play "chef".  He cooks for his mommy and daddy every day, and part of his play is to wear mommy's oven mitts and use her pot holders.  Santa is bringing him a play kitchen set and some toy foods and dishes.  Grandma is making him some toy potholders!

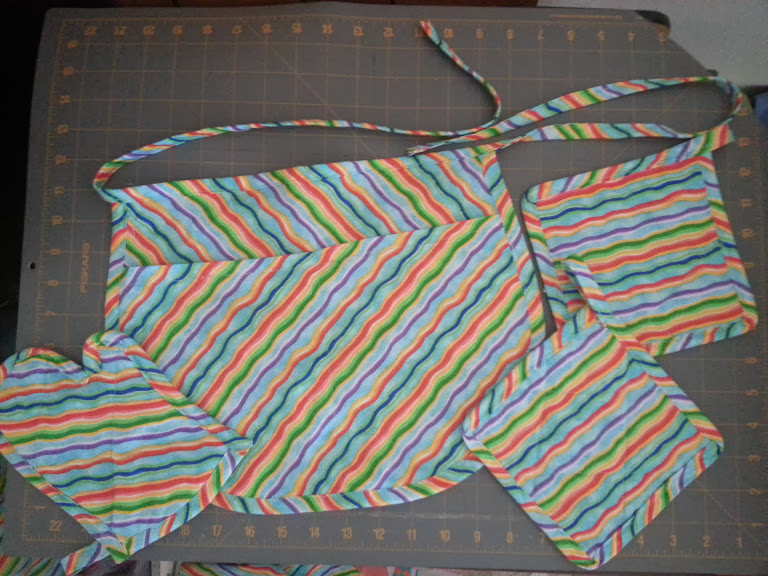
I cut 5"x5" squares for the hotpads and used the oven mitt pattern from the label on my package of Insul-Brite.  The mitt is small, but I folded it down so that it is even smaller.  (I did not use Insul-Brite in the potholders since he won't actually be handling anything hot)


I quilted the potholders and mitts with fleece. I had some plain blue fleece left over from a project that I made a couple of years ago. I bought the wrong color fleece and this was my "mistake" purchase. I haven't had anything in mind for it in the last two years, so it's perfect to use to pad the potholders. Not too thick, but soft and provides the right feel.

After quilting the pieces, only one more step! Adding the bias tape to the edges. And, here we have my weakness... I really need to get better at doing this!  With all the practice I'm going to get with this pile of potholders (I cut out more!)  I am going to be a pro before I finish them all.

I used the Simplicity Bias Tape Maker to make yards and yards of custom bias tape. Awesome little machine! I just had to try it out before Christmas! I'm not using the machine until everyone is fast asleep for the night so that nobody knows I'm playing with my Christmas present before Christmas. Sneaky, aren't I?

I decided the little kitchen set needed an apron. Yes, an apron!

As you can see, I'm having a great time making the kitchen sets and I'm using a variety of colorful fabrics. I'm going to give one set to my grandson for Christmas, one set to my other grandson's daycare, and one set is going to be a birthday gift for a three-year-old friend. The others will find homes soon, no doubt.

Bunny Backpacks

Here's an old one!  I made these adorable bunny backpacks in April 1999.  The girls loved them!  They were something I saw in a magazine and I cut out the photo and instructions and went home and made them. I remember being thrilled with the fact that they turned out so well!

They are a basic backpack with a zip top. The straps are not adjustable but they were made to fit and worked well.

The face of the backpack is a pink bottom half (which would have been fun to make into a pocket, but I didn't think of it then). The bunny arms are stuffed, they are pink with white tips for paws. The ears are floppy, just hanging from the top seam. And the eyes are large plastic google eyes that I purchased and glued on.  The nose was a little pom-pom and the mouth was hand embroidered.  I had rick-rack to add to the neckline between the bunny face and pink clothing piece.

It's just so cute!

My daughters handed me this photo that they found in an old photo album and asked if I would make bunny backpacks for Easter next year. Awww! My girls!

Wednesday, November 27, 2013

Yellow Sweater Dress

Any color will do, but my little yellow lover will look cute in this!

I was out shopping and found this large yellow sweater on the clearance rack. I had to buy it for my five  year old!

I started by laying a dress that fits well onto the sweater.
Then I cut out the basic shape using the red dress for a guide for the A-line dress shape and the sleeve points. The length was just right!
Then I sewed the front and back together at the neckline and attached the sleeves to the body, leaving the sides and under the sleeves open.
Next I put the right sides together and sewed from wrist to hem, making sure to keep the armpit intersection nice and matched up.
Flipped it around the right way and that's it! One yellow sweater dress! So sweet and cozy!
I would love to take a photo of her wearing it, but she's got it covered in sidewalk chalk and juice and various other colorful spits and spots. It's been through two wearings already. Next time I'll get a photo of her wearing it. So far, it's holding up rather well!

Mulan's Matchmaker Hanfu

Made It!!!

The girls have been wishing for Princess Mulan dresses for quite some time. I finally found time to get to the fabric store and while I was there, I actually remembered to grab up some pretty blue fabric for the waist band. Really, that's what the big wait was all about. I've had the pink satin and the red trim for quite some time.

I only made one dress because my older girl is growing out of the dress up stage and she would rather wear something normal but themed. I haven't figured out what to do for her yet, but I did buy some Star Wars fabric for when I figure something out. In the meantime, only one hanfu is in order. Which works because Libby's 5th birthday was quickly approaching so the dress could be a gift.  

It only took me a couple of days to make the dress, which would equate to a couple of hours in normal person time. It's been proven many times that I am not functioning in any level of normal, sewing or otherwise. But it should be noted that it was a quick project.

I used a normal looking dress pattern, mainly for the measurements of the shoulders and sleeves and bodice width. The hanfu does not at all resemble the pattern I used, but I am growing out of a need for much of a pattern; I just need the major cutting points and then I can wing the rest of it.

I made the hanfu just like a dress in that it has a top bodice section and a bottom skirt with a zipper up the back. I'm not so sure that is the proper way but I wanted it to have some flair at the bottom and I wasn't so sure a shift or A line cut would have the same effect. Besides, the gathered waistline would be covered by the waist band so it didn't really matter. I also made the skirt ankle length (or so I thought until my kid put it on and I discovered her legs are a lot longer than they used to be!)

I cut the sleeves the right length and then added "bat wings" to the wrist. I also made the tip of the wings longer than the top of the wrist so that it resembled Mulan's long sleeve tips without going overboard. Just a bit of effect for authenticity but not enough that it would be annoying to wear. 

The bodice top gave me some pause. I had to think about how to make it overlap like a robe. I ended up cutting four bodice pieces and then folding them and ironing them down the way I wanted them, trimming off the unwanted half at the diagonal and stitching the two pieces of bodice together at the waist. It has a lining of the same satin, which is why I needed four pieces. Two outer and two for lining. There is probably a hundred easier and more conservative ways to cut the bodice out, but to keep it straight in my mind, that's how I did it. I will have to practice or draw up a little pattern piece.

I used some of the leftover cheap red stuff that I used for the Captain Hook Halloween costume last year to trim the bodice and make the red waist belt. The embroidered blue piece was easy to make into a waistband. I measure the child around the middle and made a rectangle to match. I sewed the red band to the middle of the blue rectangle and added apron ties.

Now I had the pink satin underdress with the red trim on the bodice and the separate blue and red waist band. Done!

There were just a couple of problems. I forgot the red upper skirt and the waist band slid straight down that satin covered kid. It wouldn't stay up.

I added a piece of gathered red to the bottom of the blue waist band and that fixed that issue. Then I tacked the waist band to the dress in the back, front and under the arms to keep it from sliding down. We don't need to spend all day yanking the waist piece up over and over again. Now, it's done!

Princess Mulan's pink hanfu was an awesome birthday gift for my little birthday girl! We hauled it around all day at Disneyland on her big day, but it was too hot to wear satin. Also, Mulan wasn't "home" when we went to the Princess Fantasy Faire. In the evening when it cooled down, she put her hanfu on over her clothes in lieu of a jacket.  It was so cute!  We sure heard a lot of compliments in the couple of hours that she wore it and her little friend instructed me to make one for her and her sister.

Happy Birthday to my little princess!

*** UPDATE ***
11/8/2013

My little Mulan met the real Mulan at Disneyland. Mulan saw her and gasped with excitement! She was like a little princess on Christmas morning when she saw Libby in her Mulan hanfu! Very exciting! Here are the princess twins together:


Jasmine Costumes

I've realized that my sewing skills are pretty rusty. My stitching lines are a little crooked here and there. Ok, fine. They are crooked everywhere. Oh well. It's still fun!

I am using a variety of patterns. The pattern for the pants is a sweatpants pattern, and it is unbelievably high waisted! I'm annoyed about the waste of fabric, I've had to cut both pair of pants down several inches. Princess Jasmine does not wear her pants up around her rib cage. She should, but that's another story.


Since I'm using a light satin and organza, the raw edges are a constant battle to deal with. At first, I just sewed up a quick seam. Oh no, that won't work. I went back and trimmed and tucked the seam in and made a french seam out of it, well, sort of. It's all tucked in and neat now, even if it isn't done correctly. I don't think this backward french seam would win me a ribbon at the county fair.


After I spent some quality time tucking in my seams, I went with french seams the rest of the way through. They look much better, even if the stitching lines look like I was drunk when I was sewing along. I wasn't, I swear!

Honest, Ossifer, I'm not drinking while sewing! Did I do that?

The tops either need a lining or facing. I just hate to use satin facing since it just adds to the fraying problem and doesn't solve anything. I ran out of fabric to cut out linings though, and didn't find a matching color at the store. hmm. I came up with a solution! I zigzagged the seam, tucked it french style, used Fray-Check where I clipped the seams, and top-stitched it all down. Now, you can see the seam right through the organza. No problem! I thought of that!


Princess Jasmine has a lot of gold bling on her outfit, Disneyland Jasmine does, not movie Jasmine. I got some gold trim and will be trimming right over the visible seams. Poof, they are out of sight! I used a loopy decorative ribbon on the armholes and will use the same on the neckline, and I used a pretty beaded ribbon trim on the waist. I did not realize the ribbon was beaded too. I thought it would be quick and easy, just sew the ribbon and the beads will hang. Oh, not so easy! The ribbon is beaded too. I did a "stitch in the ditch" trick that I learned from quilting, worked great.

Well.... it worked great most of the time. Didn't work so well when I missed the ditch.


This is Gracie's top. It isn't done yet, but it's close. I forgot that my child has a big head, and didn't make an allowance for that little problem. I had her try it on and I managed to sqeeze her big melon through the head hole, but just barely. Otherwise, it fit just fine. I will be making a faced placket in the back so she can get her head in and out. Might come in handy. Then I'll finish it off with gold trim around the neckline to cover the visible interior seams.


Redondo Twirly Skirt

This skirt is dangerous!  Dangerous if you can't handle being dizzy, that is. I cannot; therefore, I will not wear one. I will not spin and twirl.  My daughter will. She's five; she can do that.

The first time I saw this skirt, an adorable little girl in my daughter's kindergarten class was wearing it. The next time I saw her, she had another one on. Then another. Her mom sews!  I got to know her mom a bit, but I forgot what she said her name was. That's ok, I just call her "The Redondo Mom" because of the skirt. Well, I don't call her that, I just refer to her silently in my mind as the Redondo Mom. Pretty sure she wouldn't answer me if I actually called her that out loud. Yeah, that might not be so cool.

That was 2 years ago. I've been thinking about that skirt ever since. It's that stinking cute! 

Recently, Redondo mom shared the pattern with me. I was so excited! Like, Christmas morning (after coffee) excited! I traced the pattern, all sizes, then traced another one for a friend of mine who has two little twirly girls, and returned the pattern unharmed by my crazy children.  They'd find it and spill something on it for sure.

The skirt consists of three pieces. One is a rectangle, I totally understand that one. It's the waistband. The other two pieces are completely confusing.

I've been sewing for 21 years now. I've seen so many patterns and could most of the time put them together. This one had me completely baffled. The two skirt pieces look like partial snail shells. I held them and tried to figure out how on earth they make a skirt, and how they fit together, which way is up, which end goes where... yeah, I don't know.

I followed the instructions very carefully. Rechecking every time I put things together. It never made sense. I put the curves together even thought it felt like I was making mistakes. They didn't look like they wanted to line up. But, that's what it said to do.

First, I made five swirls, then put those curly panels together and you'll never guess what! It totally made the cute little skirt! Perfect!!! I'm not sure how that happened when it felt so weird. I really need to practice sewing things that have no straight lines. This was a step out of my comfort zone. Which made it especially satisfying! 

Then I tried out the pattern on the largest size pattern. It was so sweet! But it turned out too long for my little spinner. Hmmmm....  Let's try again.

I now knew which end was up, so I shortened that end. I also cut the pieces a wee bit skinnier and made one more for six panels. Then I cut two types of fabric for the panels so they could alternate. Of course, I cut a couple of pieces backwards and had to recut them. I'm learning.  I sewed them together and next thing you know, skirt #2 was done!  Score! It looked a lot better than the first. In fact, it looked good enough to wear.  We gave it to a little girl for her birthday. 

Then, I made a third. This is fun!  Skirt #3 turned out just  as good as the second one and I love it! More than that, the girls love it!  The largest size fits my smallest girl, so I'm going to have to figure out how to expand the pattern for my bigger girl. She likes to twirl too. 

The skirt doesn't take long to sew. Maybe an hour or two at the most. Of course, it takes me longer because I have to keep three kids from taking all my pins out of my pin cushions, cutting up my fabric scraps, running hotwheels under my sewing table (over the pedals) and keeping the Barbies from climbing all over my ironing board. Slows down the sewing a bit.

I cannot wait to make more Redondo skirts! Thank you, Redondo Mom! or whatever your name is.

Long Swim Trunks

I looked and looked and looked online, but couldn't find any swim trunks that have full leg coverage. There must be boys that have sensitive skin or just want long pair of swim pants, aren't there? Guess I found a niche market that isn't being served.

That's ok. I have a sewing machine and I know how to use it!

I bought two pair of men's swim trunks (because the fabric is cheaper this way and the variety of fabric is more plentiful) and cut them down to size. I also cut out the mesh panties, or underwear as men say. Then I stitched them up like a little pair of pants, added elastic to the inside of the waist where there was once a drawstring. I attached the decorative waist piece and had a wonderful pair of little swim trunk pants! Perfect!

I ended up cutting the back pocket because of where it lies on the trunks, it was in the way. No problem, it just became a smaller back pocket and the raw edges were sewn into the center seam. Not all pockets go right to the middle of the pant, but I'm not going for perfection here, just improvising and the pocket isn't all that noticeable after all. Funny, it's still perfectly useable!  

I think one pair turned out great, and the other pair looks like clown pants. The striped fabric didn't look as good in the small size. Oh well, those will be the back yard run through the sprinklers and get muddy swim trunks.


Ta Da! Swim Trunk Pants!

I'm so happy that I was able to sew something for my grandson to meet his special needs without compromising his fun and he still looks a lot like all the other little boys at the splash pad. Lookout, world, we're going to have a fun summer!

Lightning McQueen Dresses

My latest sewing project was to make Lightning McQueen dresses for the girls.  They just love the movieCars but the merchandise, especially clothing, is all geared to boys.  To be fair, boys don't get much merchandise to choose from when it comes to Cinderella.  There was a prince in that movie too!  That's ok, Mom to the rescue!  Gender-equity for Lightning McQueen!


I decided to keep it simple and avoid buttons and zippers.  I got a  new sundress pattern for Gracie that has a halter style top and an elastic waist. She has a dress this style already that I bought for her at Kohls, so I know it will work well.  I measured her and got it all cut out and sewn up fairly quickly.  Somehow, I still managed to get it too big around the middle.  I'll just add ties, I almost put ties on it to begin with but decided not to.  The pattern does not call for a waistband or ties.  I thought the waistband was cute though, because it broke up the busy fabric print a bit.


Libby's dress was easy!  I used the same pattern that I had just used on her Tinkerbell sundress so I knew it fit and I knew how to sew it already.  I made a couple of modifications, very slight.  I shortened up the armhole; I thought it was too big on the Tinkerbell dress.  And, I put the straps at the edge of the yoke instead of moving them in a bit.  With the Tink dress, I moved the straps in to be sure that the dress would stay up on her shoulders, and that worked, but, it made the yoke look goofy with the corners sticking out.  So, I shortened the width of the yoke and put the straps on the edge where they belong.  Ta-Da!  I also trimmed up the dress with some plain red to limit the busyness of the fabric print.  Lightning McQueen comes in some very exciting print!


The dresses turned out so cute! The girls were playing and dancing around me while I sewed waiting for me  to finish.  Very distracting! I decided to move my sewing machine to the wide space in the upstairs hallway. The light there is excellent. I can peek over the edge to see the girls downstairs, and I'm closeby to watch them if they are upstairs. Seemed like a good idea in theory.  But the space is small.


I've been sewing for 18 years.  My first machine was a Mother's Day gift in 1992 from my husband. He had no idea if I would even be interested in the slightest, and we sure didn't have the money for it! But he took a chance and it paid off. I love it!  For the first time ever, I got my finger in the way of the needle.  The needle went right down through the very tip of my middle finger.  It hurt!  I've had worse paper cuts, but in the moment I kind of forgot about that. The girls made sure I got a Dora bandaid and some kisses, ahhhh, all better! 


I also tried to figure out how to work that serger of mine.  I still can't figure it out. I'm about ready to sell it and get a simpler machine. I wanted top-of-the-line so that I would never have to upgrade, but maybe that wasn't such a good idea.  I'm hoping to find a serger class, but so far I haven't had any luck with that either. I think my problem is tension, but maybe that is just the result of another issue. Hard to say.


In only one weekend, I was able to cut and sew the dresses!  Cute new Cars dresses needed an outing, so on Monday we went to Disneyland and California Adventure!  Highlight (one of many highlights) was seeing Lightning McQueen and Mater!

Daddy Dress

Daddy's shirt might make a nice play dress. Hmmm...


Why, yes, it certainly does!


She said it's like Daddy is hugging her all day long!


Daddy said his shirt looks even better then it ever has!

Monster Blanket

I made two "Monster Blankies". I saw the cutest panel for a baby quilt at the quilt fabric shop in old town and I just had to have it!

The panel already has a quilt printed on it, this promised to be easy-peezy! The preprinted blocks were the alphabet letters in monster style. Cute baby pastel colored monster letters! Too adorable to leave in the store! They only had two yards left and none in the bright colors meant for a boy quilt. I went home with the remaining monsters.  I had to pair it with something for the back and I thought something soft and snuggly would be best. Off to Hobby Lobby  for something soft. I found a  hot pink with white polka dot minky. It feels so soft it makes me want to snuggle!  They didn't have any satin blanket binding that matched, so we went to Joann Fabrics.  They didn't have it either.  Walmart, and our last hope, they had hot pink! Score! Grabbed all they had (3 packages, hope that's enough).

I put some batting in between and the little monster blanket was nice and cushiony soft. The edges of the panel were printed right up to the edges of the fabric, which made adding the binding a little tricky. I had to fold the binding all in half and iron it so that it became 1" rather than 2" binding. That's a lot of ironing.

I quilted all around each monster block to hold the layers together. That was fun because I spent so much time looking at each adorable monster. I really enjoyed this fabric!  Then I added the satin binding. I really do not know what I'm doing exactly, and it shows in the corners. Binding is the hardest part and so many people make it look so easy. Someday I will master this, but for now I just have to hope the babies who receive these blankets don't look at the corners too closely. 

One blanket is for Gracie's teacher. She is having a baby girl in November and I think monsters and hot pink polka dots are going to fit her style just fine. She has a fun personality.  The other blanket will be for Katie if she has a girl, or for the neighbor across the street who is also having a girl. If Katie is having a baby girl (we find out soon) then I'll make another blanket for the neighbor, but I don't know if the store has more monster fabric or not. I should go back and find out. I am waiting to hear if Katie is having a girl or boy. Maybe the store will have the bright boy panel, and maybe I'll need that one. I'm dying to find out! In the meantime, I have one girl blanket ready for the neighbor or Katie. 

Minky fabric isn't cheap and neither was the monster fabric. I wish sewing was a good way to save money, surprisingly, it isn't. But, I love doing it!

I am so happy that I made this blanket for Gracie's teacher, Ms. Andria. I could tell by the look on her face that she loved it. Hope her little baby does too.

Snow White Dresses

I made the first little dress for Gracie and then I made a pinafore dress and bloomers for Libby, a sundress for Libby, and the two Snow White dresses. I also serged up some tears in my favorite worn out jammie pants and I sewed patches on Lexie's jeans. That was on the sewing machine though.

I've been able to find little snippets of time to get in my sewing room and spent some quality time (that's using the word loosely!) with my machines and patterns and scissors and fabric... love it! I love the room. It's too dark in there at night, I need a better lamp. But otherwise I just love the room! 

I finished the Snow White dresses just in the nick of time! I decided Snow White's sleeves were too hard to mess with, so I incorporated a red ribbon at the waistline to give the dress that bit of red that it needed to make it authentic. I omitted the white collar and didn't make a red cape either. Gracie said she needed a red cape, but I told her it's ok, Snow White doesn't wear her cape except when she goes in the woods and we weren't going to the woods. 

I made them from a light glitter infused satin. Satin is hard to sew! It frays so badly. Both girls' dresses had issues with fraying. Gracie's dress frayed right through the threads and got a hole in the shoulder seam. I was at Disneyland and kept focusing on that hole. It drove me insane! And Libby had a spot right on the front neckline that wanted to fray out. That'll teach me not to topstitch!

I wonder about my serger knife. It doesn't cut well with gathers and thicker seams. If there is a spot where the fabric is doubled, it seems fine, but if there are more than two layers of fabric, the knife often times does not complete the cut, making the seam absorb the excess and sew a big lump. 

I need to learn how to use the differential feed. 

Here are the dresses. I did receive several compliments and comments on them, but best of all, the girls loved wearing the dresses!


Rapunzel, Rapunzel, Let Down Your Golden Hair

"She did, and then the prince climbed up."  That's how I remember the story, this doesn't exactly happen in the Disney movie. But, the Disney Rapunzel has a beautiful dress!

This dress is adorable, lovely colors and has lots of pretty ribbons and frills.  Plus, it's comfortable and Rapunzel proves that it is perfect for playing hard in this dress. She does all sorts of things while wearing it: swinging from trees, running, jumping, swimming, what doesn't she do in this dress?

She doesn't scratch and itch, so this dress has to be itch free in accordance with the wishes of the princesses in this house. They help with design. Libby likes to make sure she can put on her dress by herself, and take it off independently too. She is a do-it-by-myself kinda girl. Gracie was more interested in making sure lots of just the right ribbons and lace were on the dress. She came shopping with me to choose the appropriate Rapunzel trims. 

I've been wanting to make a Rapunzel dress for quite some time, but had other projects. Finally got to it! And it was worth the wait! So pretty! I'm amazed at how well it turned out. I am making five Rapunzel dresses, and have three done. All a little bit different so far.

The first dress, I finished it twice so maybe it counts as two? I love it and I hope the little girl who gets to wear it will love it too. I made it for a sweet little girl named Leah. She's three and had a rough year. I wanted to give her a gift and help keep her smiling. Her mom does a great job of keeping her happy, so she didn't really need my help, but it made me feel good to make a dress for her. I can't wait to see pictures of her wearing her dress!

I made this dress with a peasant style top (a pull-over with an elastic neckline). I opted not to add the neckline lace to avoid the itch-factor. I lined this skirt with an eyelet cotton underskirt with a scalloped hem. It peeks out from under the purple skirt. It looks just like Rapunzel's dress in the movie in that regard. She has a petticoat that peeks out too.
There isn't a waist sash to tie, so there isn't any room to grow in width, but it seems to be a pretty forgiving style so it should fit. I topstitched the ribbon lace-up on the front of the dress so that it wouldn't be a problem with coming undone every few minutes. After I stitched the lacing down, I wasn't sure if I liked that idea or not. It will be better than lacing and relacing it repeatedly though. 
I made her dress and finished it before Christmas. It was ready to ship and I laid it on the side table stacked on top of some things, where nobody would notice, and it was handy for me to take to the post office. It wasn't in a box yet, but it was folded and out of the way for the day. I took the girls to Disneyland and when I came home, I found the dress in a wad under the dining table and smudged with ketchup! This is what I get for leaving it out, but I honestly thought it was out of sight and wouldn't be bothered. I live and I learn, every day.

The ketchup was isolated to the outer skirt, the rest of the dress was still in perfect condition as far as I could see, so I took the dress apart and made a new skirt for it. I didn't want to wash it and lose the newness of the fabric. There is always a sheen when it's new that is gone after the first washing. I will laundry test the dresses I made for my girls, but this one was done and I just wanted to finish it again and not have to worry about the detail work on the bodice falling apart in the wash. It can fall apart after Leah wears it to DisneyWorld and spills chocolate ice cream on it, falls down and puts a hole in it, or gets marker on it when she's getting an autograph, after the fun! Just like Libby does. I'm fairly confident that it'll be fine in the laundry on a regular wash and dry, the other dresses I make go through the laundry without incident, but since it is for someone else, I wanted it to be nice, very nice.
You heard me right, the dress is going to Disney World in Florida! Super Fun!

The next dress, I made exactly the same way with the peasant style top. Libby loves this style since there are no buttons nor zippers to challenge her independence. I made the bodice and used the washed skirt from the first dress. It fit perfectly and you cannot tell the difference between the laundered skirt fabric and the new bodice fabric. Score!

I didn't have enough eyelet lace for the underskirt and so I added a white lace trim to the purple skirt for that petticoat look without the lining. It looks pretty good. And now that I study the Disneyland Rapunzel character dress, I think her white petticoat is actually a lace trim sewn to the purple skirt. This time I didn't sew down the lace-up ribbon, I just laced it through some ribbon loops and tied it.

I topstiched all of the bodice ribbons. I want them to stay in place, plus that's what they look like in the movie. If you pause the movie and really take a good look, Rapunzel's sleeve has topstitched pink ribbons, but the front of her dress has eyelets, with grommets, and laced up with pink ribbon. I don't do grommets. I used a ribbon to make little loops and topstitched a pink ribbon over the top to make the edges of the bodice vest look.

I didn't add the lower section of the sleeves because the girls would get too hot and the sheer fabric on the lower sleeve would fail the itch test for sure! 

Now that I really look at the bodice and the lace-up detail in the front, I think I put it upside down on the first dress and then sewed it in place that way. OMG! I Did!!! Ugh, why did I do that! It ties at the top of the bodice, not at the waist!  Ooops! Hopefully the three-year old won't notice my big blunder, but she probably will. 

Libby loves her dress but it looks a bit short in the bodice. I'll have to remember that my kid is growing and make the bodice longer next time. She now has three princess dresses in this same bodice size and style: Belle, Cinderella and Rapunzel.

Gracie's dress is the third one I made. Her bodice is completely different in that it isn't a peasant style. It has a zipper down the back.  She insisted on having the lace around the neckline, I was hesitant for fear of her complaining that it would itch (the anti-itch factor is very important, can you tell?) so I finished the neckline first and then added the lace just in case she wants me to remove it, I can keep the neckline in tact. Nice to have the option to change your mind, right? If/when she asks me to remove the lace, I can take out one row of stitching and the second row will keep it finished and neat. I won't have to sew it again. Ta-da! Much to my surprise, she really does like the neckline lace. Bonus.

I made her bodice a size 7 since she's been growing so much and the last dress I made was a size 6. Wrong. She grew a lot! And she's grown round the middle much more than she's grown toward the sky. I had to add a piece to each side of the bodice to accommodate her chub. I just guessed at this, there is not technique involved, just took a couple of scraps and made long triangles out of them and stuck them between the bodice front and back all the way up through the armpit. The sleeve hems still meet where they were originally planned. The length of the bodice is just right, at least I didn't mess that up like I did with her holiday dress (she never noticed).

Just like Libby's dress, I added a white lace trim to the purple skirt to simulate the look of a petticoat peeking out from under the dress. I used the leftover eyelet lace from the quilt I made for her for Christmas.  It totally rocks. She isn't complaining about the waistband itching so I guess she's ok with no skirt lining. I did her lace-up the same as Libby's with the loops and the ribbon laced loosely. So far, it's only come untied a few times. I'm debating whether to stitch it in place or not. I'll have to compare notes with Leah's mom and see what she thinks of the topstitched ties.

Gracie's skirt has a different  floral ribbon going down the front of the skirt. Disney's Rapunzel has an embroidered floral motif along the edges of her skirt in the front along her center pleat. I duplicated that look by running two lines of flower ribbon down the front of the skirt where a pleat would be. The first two dresses have a more colorful ribbon of little flowers, this dress has pink flowers. I ran out of the rainbow flower ribbon and the store did not have the same ribbon in stock when I went back for more. That's ok, this ribbon is pretty too and they don't need to be identical in every way.
I think the dresses are authentic enough to the movie costume and yet simplified just enough for little girls who play hard. Gacie and Libby are testing the durability of the dresses as I type this out. For the past two days, they've both covered their dresses in food and juice drippings, a bit of dirt, and twirled a million times. They are thrilled! And, they figured out that if they wear their super poofy skirts underneath that Santa brought them, the dresses look even better. Cool!

I have enough fabric and ribbon to make two more dresses for our favorite local friends. They have spring birthdays and I think these will make very nice birthday gifts. These little girls love to play dress-up just as much as my little girls so I know they will be a big hit. That will be five Rapunzel dresses by the time I'm done! Unless of course, someone else wants one.  Hint!